Sunday 18 March 2012

Never say "never."

     In years past, I'd go to gaming conventions and watch some gamers play tournaments using a small number of figures on a tiny field, oh, say the size of a briefcase, as they intently and intensely battled it out with their opponents. They were playing DBA ("De Bellis Antiquitatis") and I couldn't understand the allure. If I was gonna play a war game, I was gonna play a real war game, with a real field and a real number of troops. So let it be written; so let it be done.
    Until Saturday... ...when I agreed to play DBA under Martin's tutoring. Martin and I with Hittites (or neo-Hittites) played Robby and Bear with Alexandrian Macedonians. I fully expected to be skewred, filleted, and sauteed over a low flame by masses of pikemen, but I was surprised; utterly and completely. In the interest of full disclosure, we played DBA Grand Battle (my term) which had 4 commands and almost any number of elements in each command. The one base = one element/no-units-of-historical-note took me quite a while to get used to. To me, 8 stands of pikemen would be a Macedonian Taxis (singular), but in DBA, it's 8 elements of pikes. I still don't quite get it.
     When the game started, we advanced aggressively toward each other. I had a command of heavy chariots ("knights") with some foot skirmishers and a command of  spearmen and skirmishers. Martin had a command of heavy chariots and one of light chariots. Robby had a command of skirmishers and Argyaspids/hypaspists, and a command of pikes and skirmishers, while Bear let a command of pikes and skirmishers and a command of light, medium, and heavy cavalry and foot skirmishers. Tom joined later and took Bear's pikes. I expected the pikes to tear apart my spears so I decided to slow them down with "speed-bump" skirmishers. (Skirmisher vs. skirmisher is like watching two squirrels having a slap-fight.) Bear led with his light cavalry with the cavalry and Companions coming up behind. When the heavy chariots met the light cavalry, it was gruesome. Then the heavier cavalry came up and we hammered each other until the game ended.

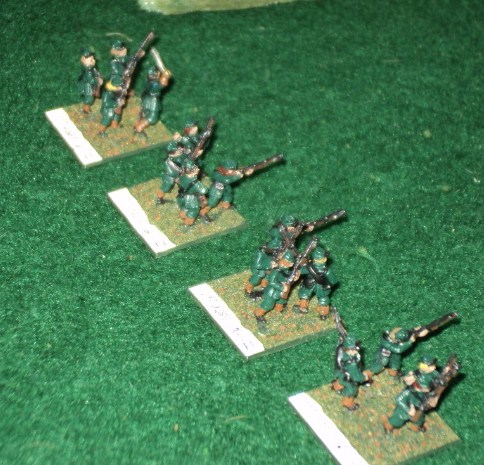
Martin supplied all the figures. These pikemen are a fine example.


Light Cavalry, Companions, the command's general, and heavy cavalry
begin to menace my innocent chariots.


Two lines of Hittite spears led by a line of "Psiloi" as DBA calls skirmishers.


Martin's commands - Heavy Chariots near and light chariots and Psiloi far.


Skirmishers are hard to kill! Here some of mine dance around in front of
Bear's Companions as my heavy chariots sneak up.


It took a while for us to actually get into combat, but it got bloody once it did. Martin's light chariots scrimaged with Robby's Hypaspists for a long time and everybody became splintered, which makes a mess of command and control in DBA. The heavy chariots and the pike exchanged evil looks until they closed to the attack. I was able to slow down Bear/Tom's pikes with my Psiloi and I slowly brought the spears up. They would still be no match for the Taxis, but they didn't melt like an icecube on the sidewalk when they fought.

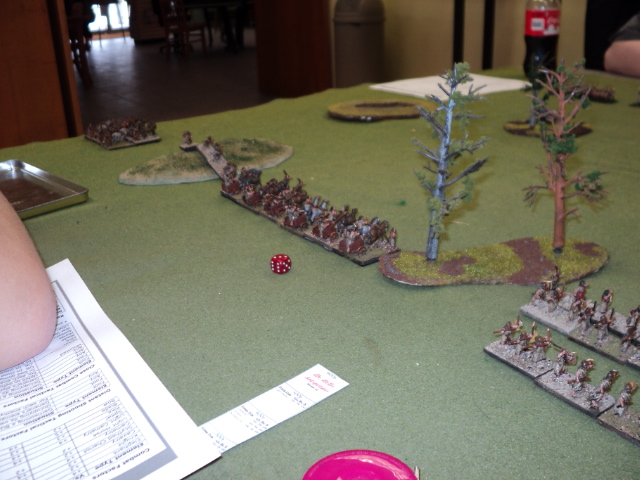
Martin's heavy chariots confront Robby's pikes and mercenary hoplites,


Here my chariots are gleefully taking Bear's light cavalry apart. It took
longer than I'd thought.


The situation on the Hittite right at the end of hostilities. I've got Bear's
general in a mousetrap while the rest of my heavy chariot elements are
scattered... which doesn't matter for morale in DBA but it means a LOT for
command and control. 


Martin's light chariots and Robby's Hypaspists were both in bad morale
shape and Martin's heavies were in worse morale shape. The pikes were
shaky but still in good order.


     I must admit the game surprised me. It was tough right down to the wire. Everyone's morale was teetering and a lot of stands had been lost. As your command loses cohesion and troops get scattered, it's harder to get them to do what you want. Every turn each command rolls a d6 and that's how many actions you can do. One action can move 10 stands or more if they are in base to base contact. If they are scattered, it take one PIP (or action) to move ONE stand. If you're morale is compromised, it takes a PIP to have a stand or a group of contacted stands stay put! Command and control becames primary and very tough as the game goes on. THIS was the real surprise to me. Players/generals have to make some serious decisons as to what is a priority, especially if a one is rolled.
     I apologize to James Bond film lovers everywhere for the title of this entry, but I surprised myself with this game and that's the only title that made sense. I think I'd prefer the Grand Battle DBA for it's visual impact, but the mechanics make the game interesting. Of course, armoured phalangites vs. men in bathrobes with spears still does not seem to be a fair match, but this is the oddness of the game play and something that just has to be swallowed cum grano salis. There is not allowance for armour, training, or morale in any of the troop types... unless it can be found in the subsequent DB...'s that have come out since.
     I'm hooked.


The Hittite spears and skirmishers begin to get the dirty end of the stick
from the pikes.


Robby's pikes and mercenary hoplites face down Martin's chariots.
("Do you feel lucky, punk? Do ya?")

The Macedonian view of my end of the table.
That many chariots are impressive.

Friday 16 March 2012

The War between... the stairs and the kitchen.

This was not the ultimate in architectural conflict but a lame, civil-war-ish title for this blog entry. Rob and I played this game on tables set up in the living room late in March Break. It was first time to use Mr. Lincoln's War for an American Civil War game. I'd played the rules before, but Rob was new to them and -as usual- he caught on quick.

Mr. Lincoln's War is a brigade level game of the ACW. Infantry are based four to a stand, representing 80 men or one company. Cavalry are two to a base, and artillery is represented as one model to 2 actual guns. Command and control are very important as is brigade cohesion. Ranges for weapons are really long, i.e. up to 80 inches for 3" Rifles or 10-pound Parrots. Good rifled muskets - like Enfields or Springfields - have a long range of 24 inches while smoothbore muskets top out at about 10 or 12 inches.

Rob commanded the Union forces - a division of 4 brigades, a cavalry regiment, and 4 batteries of 3 stands each. One of the brigades was the famous Irish Brigade whose regiments were tiny, between 2 and 4 stands, but all veteran. There was a brigade of Regulars (Veterans), a brigade of Zouaves (with the Garibaldi Guard attached), and a brigade of Pennsylvanians, including the 42nd ("the Bucktails" - Average, sharpshooters, with breachloaders) and the 54th PA, which I'll say more about later. The cavalry were Average led by a Colonel Custer. Attached to the division was the 1st U.S. Sharpshooters (Berdan's - 4 stands, Elite, sharpshooters, breachloaders) and Robby was impressed, if not in love.

Bredan's skirmishing. Crack shots, all.


The Irish Brigade advances. Veterans but some were armed with smoothbores!

The Pennsylvanians with artillery support. (Since I was born in
Pennsylvania, you'll excuse me for having a few regiments from
the Keystone State.)

The Zouave brigade - 114th PA, 11th Indiana (Wallace's), 146th NY (in light
blue) and the 39th NY (The Garibaldi Guard - not Zouaves, but colourful)


My Confederates (3 brigades, a cavalry regiment, and 4 batteries, 2 bases each with mixed guns, i.e. Napoleans {12# smoothbores, and 10# Parrots or 3" Rifles}) were holding a town with one brigade (Virginians, based on the "Stonewall Brigade"), while two brigades (Texans and Georgians/Mississippians) rushed to re-enforce. Oddly I ended up getting the initiative every turn.

The  Virginians in the un-named town with a regiment in reserve. As for the
town, Robby liked "Spotsylvania", but that was taken already.


The Texas Brigade - 4th, 5th, and 1st Texas from left to right.


11th Mississippi, 23rd Georgia (skirmishing sharpshooters) and 7th Georgia.
The light green felt was rough ground, dark green was forest.


I deployed the Texans to the right of the town toward a large hill awaiting the Irish, the Missi-Georgians to the left with the cavalry in support facing the Pennsylvanians. The Virginians took to the buildings and waited for the Zouaves and the Regulars. Their battery sighted down the road and hit one of the Union batteries in counter-battery fire, but they were too busy after that to maintain that fire.
Here's a "satellite view" of the field that Robby took, standing in a chair.

Top - The Irish and the Texans move to face each other with the barn between
Centre right - the Regulars and the Zouaves converge on the town.
Centre Left - the Pennsylvanians hold the forested hill and the Mississippi
unit has already been cut up. The Georgians deploy and begin to come up.


Here you can see the Virginians defending the houses and the bivouac of
tents outside of town.


My Mississippi-Georgia brigade was cut up by the Pennsylvanians and three artillery batteries early in the game. Later events destroyed the brigade and the supporting cavalry. The Virginians held tough but took casualties steadily as the Zouaves, Regulars and Cavalry advanced. The Texans faced down the Irish, punishing them, but being tied up by them for the whole game- my biggest brigade with elite troops (1st Texas) fell into my son's trap! The Zouaves were about to assault the houses, while the cavalry charged the surviving gun (it's mate having fallen to counter-battery fire a few turn earlier). The Virginians' commander had been shot out of the saddle early on - by friendly fire no less! The cavalry overran the gun, continued through the town in the next turn, capturing the divisional commander, hitting a battery from behind and sending it routing. In their breakthrough, they met the 11th Mississippi which was being rallied from a rout by the cavalry and hit both the infantry and cavalry in the flank. Neither lasted long. Custer's horsemen swept away the whole flank, leaving the town and it's Virginian defenders cut off and the Texans hanging in air. We called it at that point.

One of the Stonewall Brigade's regiments defending the town.


The Zouave Brigade masses to assault the houses. The Garibaldi Guard
were dressed in uniforms based on the Italian Bersaglieri. Wallaces' Zouaves
were distinctive in their grey outfits.

The Union Cavalry meet -and capture- the divisional general.

The Brigade of US Army Regulars follow the cavalry through town.


A Pennsylvania regiment flanks the Georgia skirmishers and captures a
stand, already removed.

End game! The Union cavalry flanks both the routing 11th Mississippi and
the rebel cavalry, sending them both packing. Behind Custer, the gun from
the routed and cut up battery remain.


This was a good game to play, even if I lost! Rob and I like this set of rules, even if the sequence of events takes a bit of getting used to. (Check for friendly fire casualties to generals> Counter-battery fire for batteries on "Defend" orders> Give orders> Role for initiative> winner moves> other player moves> all other firing> Close combat> Breakthroughs)
Notes:
  • Artillery ranges are incredible, but probably reflect the reality
  • Small arms ranges are long too, especially for better quality rifled muskets.
  • Union cavalry get carbines, Rebel cavalry can have pistols and shotguns.
  • Morale is tricky and very important. The rules aren't always the clearest as to disruption/distress/like that for assessing morale. The morale grades are logical - Elite/Veteran/Average/Raw/Militia. How badly you fail morale determines what sort of nastiness you deal with. If a unit routs, it actually loses more stands, reflecting the tremendous disorganisation involved. Non-routing "bad" morale units bounce back fairly quickly. We ended up using coloured bingo chips to show morale states.
  • Generals die; do they ever! Every turn you check for friendly fire and generals standing alone, unattached to a unit, can be sniped at. Generals with a unit can take a hit as well. I've heard that the ACW was hard on general officers; This game sure is.
  • I'd recommend Mr. Lincoln's War if you want to play ACW. A friend of mine is an ACW reenator and he just about jumped out of his skin playing this game.
Some last photos:


The Texas Brigade and the Pennsylvania Dutch barn - please don't ask why
a barn with hex signs ended up in Virginia!


The 7th Georgia in better days. The white ring is a casualty cap - each stand
of Infantry or unlimbered artillery can take three hits, cavalry and limbered
artillery, two.

Union Signal Corps tower - a model done by my wife, Beth - a nice
atmospheric piece!


The other side of the Signal Corps show piece -again by Beth.
I am truely lucky to have married a wargamer - except at conventions,
when we have to split the money!

The Rebels unleash their secret weapon - the dreaded WARHAMPSTER.
Robby's hampster, Rous, takes a stroll in the town.


A final word on the 54th Pennsylvania Volunteers. When I lived in the States, I played tuba for about 16 years with the Macungie Band of Macungie, PA. (http://www.macungieband.com/) It's a town concert band, the 6th oldest in the nation, founded in 1854. In that part of Pennsylvania, almost every town has or had a band. Allentown, the largest city nearby, has FOUR! When the Civil War started, the band -then called the Millerville Cornet Band- volunteered and became the regimental band of the 54th PA. All but one member mustered out after a 6-month enlistment. So I HAD to do the 54th! I even have a miniature band done in Essex figures, although they didn't appear on this table. Next time! ...and they'll play "Grafulla's Quick Step"!

Sunday 11 March 2012

Cue... Der Alte' Dessauer

{Great Prussian military march, by the way.}
Lots of things going on this weekend at the Hamilton Road Gaming Group. One large group at a table playing Shadowrun (cyber-fantasy RPG), a small group at another table playing A Sky Full of Ships (ship-to-ship combat in deep space), and at a third table Warfare in the Age of Reason, the game I was in on. For those not so familar, it's a Seven Year's War "big battalion" game. Andy and his son, Steven pushed Prussians {18 bn infantry, including 2 grenadiers and 2 British Highlander, 3 regiments of heavy horse, and 6 guns, medium and heavy.} My son, Robby and I commanded the French {18 bn infantry, including 2 grenadiers, 4 of heavy horse, and 6 guns, split heavy and medium.} Andy and Steven were familiar with the rules. I'd played them once before, while Robby was a tyro at this... but he picked it up VERY quickly. Both sides were set into 3 brigades of infantry. each player taking a brigade and a half. Rob and I split one brigade, while our worthy opponents handed troops off to each other. The terrain showed two villages, two bridges, a large hill, and a long grove of trees. Initiative was done by playing card.

This is the initial deployment, seen through photos by Andy and myself.

My brigade, including two battalions of the Grenadiers de France.


Steven watches an early move as both sides begin to deploy.


The Prussians seemed to have better access to the initiative and a better plan. Well, let's just say they had a plan... which Rob and I didn't. They were to get victory point for taking the town and the hill on our side of the board. We were to get point for taking their town and the bridges. Steven and I cautiously approached each other, exchanging artillery fire. My heavy gun's crew fell back under the strain. The rules require you to get in each other's eyes to exchange musketry; Steven came on while I held back. I was in a tighter area, between the river and the town, so my brigade frontage was narrower and deeper.
Steven's brigade facing me. The Highlanders were included 'cause he wanted
them. The cavalry were Bavarian dragoons borrowed from my wife's
KoenigKrieg army.


A view of my brigade from the Prussian viewpoint. The village in the rear is
mostly paper models houses from a WarMaster website. Cheap, available,
and colourful - my favourite criteria!

Steven's Highlander begin to menace my troops. For some reason, our rolls
for musketry for both armies were wretched. We said it must have rained
and the powder was wet. Yeah, that's the ticket.


Rob and Andy did about the same thing, although Rob charged Andy's Highlanders with his one cavalry unit. Cavalry charging an intact unit from the front - you can imagine the outcome. They hit home and then recoiled and fell back.

En Advant! It looks better than it was. At least they hit home.
The yellow thing is a 'casualty cap'. More were to show up soon.


On my end, Steven and I exchanged cavalry charges and I got the short end of the stick. One unit bounced back and hid in the town. The other was caught in the flank while performing a manoeuvre I felt was necessary. (I never called myself a brilliant general.)

Oh, the pain! Steven's heavy cavalry catch mine in mid-manoeuvre.


My heavies in the process of being chased off the board. The yellow pipe
cleaner designates broken. Blue means disordered. Red means routed!


In the center, Rob asked me to sit on the hill with my three battalions and one gun to keep hold of the objective. He took his half brigade and faced off Andy's troops. It was a see-saw affair at best. My gun sniped at Steven's grenadiers.

Our split brigade, including two Wild Geese battalions.

How the Prussians saw them.

Looking down the hill from Regiment Buckley's vantage as the Prussians
came forward. Oh, I like the Wild Geese!


Steven and I kept exchanging musketry until one of my units broke. My grenadiers kept the cavalry at bay and their presence at the edge of the village was enough to keep Steven's cavalry from claiming the objective. (Cheesy? Maybe... but the game was friendly and we both called it as we saw it. I'll call it Poutine.) As the curfew fell, we all agreed that it was a marginal Prussian win and the French would be allowed to leave the field in good order without pursuit. (Did I make that up? Maybe. More grilled cheese, m'lord?) The Prussians did more damage to Rob and I but none of us grabbed objectives, with the exception of the grove of trees with had Prussian grenadiers camped in it, although my one battalion of Whitecoats might disagree.
Some random photos:

The French right flank scrambles to hold it together.


An early game shot of Steven's Prussian left moving into position.


The Gardes Lorraine and a disrupted heavy gun contend with Prussian
fusiliers. These French were the second rank. The first rank of troops were
cut up by musketry and fell back.


More Prussian fusiliers come on in a warlike manner. This was the first time
Andy had fielded his Prussians; they didn't suffer from the usual "New Unit
Curse" gamers know so well.


Prussian Grenadiers who deserve their fearsome reputation.

Andy's Prussian right flank face Rob's French left. This was before the
cavalry charge I believe.


Rob's cavalry and infantry advance early in the game.


Notes to no one in particular:
  1. I enjoy AoR, but I'll leave it to Andy to set up the troops. My SYW troops are based for KoenigKrieg. (Russians, Swedes, some Saxons and Reichsarmee, my wife's Bavarians, Prussians and Austrians on the blocks)
  2. Andy uses a varient of AoR which doubles the battalion size. It has true visual appeal.
  3. Artillery is really vulnerable to enemy fire. I wonder if there is some way to remedy this... or maybe I'm just playing that badly.
  4. Aggressive play is rewarded since you need to be eyeball-to-eyeball to engage in musketry. Just don't charge too soon. (I did that the last time with some Hanoverians.) The bayonet is best reserved for chasing troops who are running anyway, or so it seems to me.
  5. I wonder how light troops fare in this rule set. Cavalry isn't easy to handle either. Again it could be me.
  6. I got to play! Always a good thing!
Since it's March Break for the boy, we plan an ACW game (Mr. Lincoln's War) during the week. Watch the blog. Next week at the HRGG, 15mm Ancients hosted by Martin.