Sunday 4 December 2016

Quebec Under Siege!


This past Saturday at the Hamilton Road Games Group, things were "in flux." We had originally planned another session of our newly home-grown hybrid rules for Seven Years' War, then we were offered a session of the game, "Tanks." Finally, Wayne brought his Battletech battlefield based on the city of Quebec. (I think the title "Battletech" has changed a few times, but that's the name I know it by.)

We've all seen this battle field before and even though I didn't play the game, I took a number of photos of it since it is JUST SO WONDERFULLY NICE! Wayne refereed while Bear, Martin, Brian, Matt, and DJ played. Andy, Ken, and I watched and discussed sealing wax, cabbages, and kings.

An all-encompassing view of the city/battlefield

Checking the stats - weapons, speed, power, heat, all the usual stuff.

Each building is numbered and indexed as to strength and damage points.
Grey buildings are concrete construction, red are brick, and yellow/orange are wood.
Mechs can stand atop the concrete ones. They could stand on the brick or wood ones,
but not for long.

The "Armory" in the lower city.

Industrial concerns below the Citadel.
Axis Petrochemicals? Quick! Tell Batman!

The Citadel and the Plains of Abraham... and iced tea.

Le Château Frontenac overlooking the entire place.

Some of the paths in the old city are pretty tight.

Bear's dice
One of the pathways up the cliff can be seen centre left in white.

Here you can see the depth of the river. Mechs can travel submerged if their hull is not damaged.

DJ, Martin, Wayne, Matt, and Brian look over the battlefield.
DJ's mech prepares to defend the Citadel. He did this by means of "urban renewal."

"Urban renewal" in HRGG "mech-speak" means demolishing buildings to achieve a better field of fire.
Lovely ruins, I say.

More "urban renewal" and a chase down the tight alleys of the old city.

DJ's hand aka "The Hand of the Almighty" resetting a mech.
The Citadel was supposed to have defensive fire capacity,
but the gunners were declared "asleep."

DJ's mech takes down Bear's mech with a double head shot.
DJ later sustained so much damage, the mech's torso and arms were wrecked,
so he was a head with legs.

The fight goes on atop the ridge.
DJ and Martin successfully defended what was left of Quebec city from Matt, Bear, and Brian. I sat out mostly because I had things to discuss with Andy and I'm not a huge fan of Battetech. I've played it and I truly think that a determined platoon of infantry hidden on the table with RPGs and other such futuristic launchers would make mince-meat out of those mechs in a city environment. (...but what do I know?)

Meanwhile, here's my my son, Rob, with his new pup-dog, Atlas!

Love at first sight if I ever saw it.
I'm an Advent guy and I don't like to pre-celebrate the festival of Christmas too early, but this next photo was too good not to share.


Enjoy yourselves, folks!

Monday 28 November 2016

Napoleonics Are Still My Favourite People


Without a doubt, the "Napoleonic Period" is my favourite gaming era. The colour, the tactics, the different systems... all appeal to me. I mean, just look at my face... if you can bear it. So at the Hamilton Road Gaming Group this past Saturday, I set up a Napoleonic scenario, using a Franco-Italian Army fighting the Austrian Empire. We used Arty Conliffe's Shako II rules.

I really like my Austrians.
Beth really likes her Italians.
Martin really likes his French.
Bear, Derek, and Matt really like playing the game.
Andy was present for the beginning but went home early, feeling unwell.
(Photos courtesy of Martin, Beth, and myself.)

Here's a look at the board at the beginning of the game: 

Looking "north" -  the small enclosure counted as an orchard.

Looking "south" - the stream was only fordable at the marked fords.
The sides at the kick-off. That's a foul, reeking swamp at the far right. I should've found a Shreck figure to put there.
The Franco-Italians (Martin as C-in-C, Beth, and Matt) were to capture the road in the middle of the table as a way of moving off the board toward the cities beyond. The Austrians (Bear, Derek, and myself) were tasked with throwing the Allied side back to the river line.

Martin and Matt had two infantry "divisions/brigades" each and Beth commanded four small brigades of cavalry. Derek and I had two infantry divisions each, one of his being all grenadiers, while Bear commanded two divisions of cavalry, one heavy and one light. The Franco-Italians decided to brigade all their artillery into one grand battery for which they received an extra general officer as artillery commander. (Each infantry brigade had a "foot battery" and the commanding general had a heavy foot battery to place at his discretion. The cavalry divisions each had a lighter horse battery.)

The Franco-Italians moved forward quickly. I had written orders for Bear's cavalry and Derek's reserve grenadiers to hold for turn #1 and move on turn #2. Beth's cavalry immediately went forward toward one of my infantry divisions, the one to the right of the forest in the photo above. What happened was not pleasant for me.

Beth's cavalry revving their engines.

Bear's cavalry and my left-hand Division - the infantry are all in Battalionmasse formation.

Matt's divisions and Martin's nearer to the camera.

Derek's tough Austrian and Hungarian grenadiers.

The cavalry is coming. I'm in column at this time.

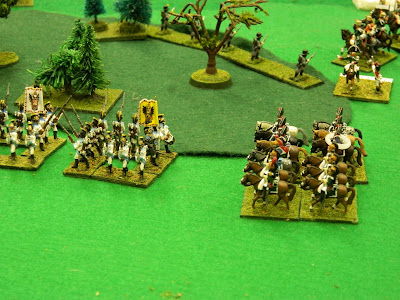
The cavalry come closer and the Austrians are now in Battalionmasse.
Battalionmasse isn't as good as square, but it can shoot (which columns cannot in Shako)
and it can move - slowly. The three units up front attempted to form square in the face of the cavalry.
Only the far right battalion was able to. The other three were caught in Battalionmasse
and my garbage-y dice rolling did the rest.
Beth gleefully annihilated the entire division except for the skirmishing jäger who ran away.
While Beth was chopping up my infantry into schnitzel, Martin and Derek were duking it out along the road in the centre of the field. Matt and Derek were also fighting hard. To Derek's credit, his grenadiers were out-numbered 2-to-1, but were holding their own against those odds. Bear maneuvered his light cavalry division to attack the grand battery, which evaded but was eventually caught by the hussars and slaughtered. (Way to go! Hoch Bear!) His heavies were taking shots from Beth horse artillery and were pushed back a bit although they recovered. (In Shako II, cuirassiers - or in may case, kurassiers - have the same morale as Guard troops. The morale rating is also a reflection of the fighting quality of a unit in this game.) As they recovered, they began to turn to face the threat of Beth's winded cavalry.

Here, Martin's lead division begins to encounter Derek's right-hand infantry division in the stretch of road
that came through a wooded area. French voltigeurs face off against Austrian Grenzers screening the advancing infantry.

Close-up and personal.

Matt's Italians advance toward the grenadiers.

Martin's divisions come up fast.
The black thing in the photo is an artillery stick. Shako II is a bit "old school" in using such sticks
to determine out-of-range, long range, effective range, and cannister range.
I like it.
The first rank of Bear's cavalry - light dragoon and uhlans - were thrown back and the artillery fell back.

But not far enough as two regiments of hussars showed.
Meanwhile, Beth's blood-soaked cavalry turned the corner around the forest and met my second infantry division. They promptly destroyed the lead battalion, while the next three battalions were able to form square. (Hoch-und-Deutschmeister was salvaged!) Most of Beth's cavalry turned to face Bear's heavies, but some remained hovering around my squares, just enough to tie my hands.

Italian dragoons and gendarmes (they're militarized police, for crying out loud!) threaten my squares.

Hoch-und-Deutschmeiser
("... with one hand tied behind me back!")

HuD, 1st battalion
AB figures - very nice.

Bear's dragoons and kurassiers exchange sabre cuts with Beth's dragoons and Chasseurs a cheval.

Derek is slowly being pushed back into the woods. He barely had room to deploy his battalions.
Curfew was coming and things were winding down. Beth send a unit of dragoons to secure the road behind Derek, fulfilling the victory conditions for the Franco-Italians. We called the game and let it stand as a fairly decisive victory for the French and Italians. The Austro-Hungarian grenadiers proved their metal again and Bear made a mess of the Allied grand battery.

Italian Dragoons "on commando" -  going to take the road.

Beth's alter-ego as an Italian commander
Lessons learned:
  • You can't leave a grand battery without some sort of support.
  • The Austrian general needs to be more specific in his order to the other generals. My orders were far too non-specific.
  • Try to form square earlier. Hasty square leaves a lot to be desired. Hence, the loss of an entire division to Beth's cavalry.
  • Form up early deployments more clearly and more closely for mutual support.
  • Be more aware of what units are in the brigade. A few combinations were not proper.
  • Watch out if your wife commands cavalry. Never forget how blood-thirsty the woman is.
Everyone said they enjoyed the game, so it was a success. I lost badly and was mauled, but I so enjoy gaming this period. (<Sigh.> Some day I'll win one.)

Martin's version of the Emperor with his huge entourage. French-Allied armies are allowed 4 aides-de-camp
for the change of orders. Austrians are allowed... two.
(It took a photo of the Austrian high command, but it's too blurred to share.)

Derek and Matt early in the game.

As I place some figures, Bear, Derek, and Matt think over strategy... or maybe lunch.

Sunday 20 November 2016

I'm Waiting For My Wine, M'sour!

I'll explain the title shortly.

This past Saturday at the Hamilton Road Games Group, Andy wanted to try an experiment, mad scientist/wargamer that he is. He put together a Seven Years War game (French vs. British/Hanoverians) using a mash-up of Black Powder and Age of Reason with a special twist: The brigades orders HAD TO be written and  any changes in orders had to be written and handed to the umpire (Andy) who then determined when those orders might be delivered. In some cases... never!

I assumed the role of Ferdinand of Brunswick, the over-all British commander. I also commanded the infantry brigades of Murray, Wolfe, and Cumberland. Bear commanded the Hanoverian infantry brigade of Luckner and the cavalry brigade of Sackville. On the French side, Martin commanded with Mark and Brian commanding the brigades.


The board -- British to the left, French to the right.
Martin and I drew maps and named the features - each had entirely different names.
I named the towns Dunkton and Shickshinny; Martin called them Alpha and Beta or something like that.

An angled view of the British/Hanoverian side. Bear has the right flank.
Bear and I won the toss for initiative. Our mission was to capture the bridge on our far left flank. I intended to have Bear take and hold Shickshinny with Luckner's troops and more or less refuse the right, guarding the army's right flank with his cavalry. I sent Murray's brigade (Highlanders and line regiments) to take the bridge. Wolfe was in reserve with a Guards regiment, a combined grenadier battalion and two line battalions. He was to support Murray at 12:00 noon, but hold his ground until then. 
Mark and Brian came on fast when they moved. A nasty firefight ensued between the Highlanders and Mark's French troops (who were "unreliable" but who did everything Mark asked of them) and the Highlanders ended up falling back and one English regiment was destroyed. I felt that Bear had misinterpreted my orders and had thrown his cavalry out too far. My repeated messages all went off into the some postal black hole. (Andy was gleefully dicing to see when messages would get through and did not had out messages with equal glee.) Martin seemed to send a lot of message and I thought his messages got through for the most part.


Brian's French Cavalry

Brian's column of French infantry and Mark's left-hand brigade

Mark's brigade on the bridge

Bear's British cavalry and his Hanoverians.

My center brigade with Wolfe's reserve brigade behind

Murray's brigade led by two large Highland regiments
Mark's troops guarding the bridge.
The French target was to take and hold the road in the centre of the board.
By this time, of course, all the plans we had were unraveling and the written message system was realistically frustrating, (It was a game and I actually kept my sense of humour.) Bear's infantry took the town and had to fall back once the French infantry came up but the town was contested right to the end of the game. Brian's infantry column felt threatened by Bear's cavalry and each regiment formed square while the French cavalry turned to engage the British horse rather than sweeping past. Murray's brigade was sorely hurt (one regiment vaporized, and the other three were "shaken.") Wolfe's brigade advanced but only barely got into the battle by the end of the game. My third brigade was being nibbled to death by Mark's and Brian's troops. 

Bear's cavalry begins its run. I was left chewing my sleeve and writing notes and orders
... that never arrived!

Bear's Hanoverians approach Shickshinny in good order.

Meanwhile on the other side...

The action get's hotter at the bridge crossing.

Casualties begin to tell. Andy cut plastic straws as casualty caps.
That's what you see on the far left of the first Highland regiment.

My mixed brigade of Hanoverians and British were ordered to hold the ground between the two villages,
even moving up to the road. It's hard to misinterpret your own orders!

Bear has the town! Huzzah!

The brigades exchange fire.
We lay down cotton balls to show when a unit has fired.

The French cavalry would soon turn to face the British cavalry and end their reign of terror over
Brian's infantry brigade,

Wolfe's reserves begin their march through Dunkton.
(I don't care what Martin called the village.)

The swirling cavalry melee on the far British right.

Now Shickshinny in contested.
Murray's brigade was broken. Wolfe's was still coming up as the "rain" began to fall. (Our table-top reason to stop playing.) Cumberland and Luckner's brigades were holding on rather well, although some of Luckner's regiments were shaken. A few of Mark's regiments were shaken, but they really did quite well. I only learned that they were "unreliable" in the postmortem. In reality, Bear's ride came and the rest of us had to get on with other things. We'd call it a contested win for the French.
The system of blind delivery of messages and orders was the point of the game, and it made the game. We used the combat mechanics from Black Powder and the movement mechanics from Age of Reason. We all agreed that there needs to be clarification of the hybrid rules in those areas, but the order system made the game. Andy had been objecting to Black Powder's rules on command, feeling it was entirely too random. This hybrid experiment gave the game the right feel. Using Black Powder sized units gave the table top the right look, in my opinion.  Using the weapons' ranges from Age of Reason required us to get "up-close-and-personal" right away. 
Had more people been able to play as brigadiers, Martin and I might never have seen the tabletop at all! Cudos to Andy on this! We'll do it again. Maybe next week.


Oooh! Mark has received a message from the High Command!
Is it workable? Is it realistic? Is it legible? Is it comprehendable?

Wolfe's brigade comes into play.

An eagle-eye view of the centre of the board.
Pinch-hitting for a tree in the town was my very old Martian Metals Ent or Treeman.
In a message Martin sent to me, he said he was sending a case of wine to my heardquarters. I don't know wine, but I think the vintage he spoke of was a-kin to vinegar or Windex or carpet cleaner. I sent a note back (which Andy promptly lost) saying "Thank you, Mon General... you raunchy B*st*rd!" Martin got a kick out of that.
I may have missed a few things in this report, but I sure enjoyed the game.


The game ending on the table. The "12:00" indicated the game time as we were to mark the time sent on our orders.
In reality, it was about 3pm and threatening snow.
On Sunday, we got a good bit of snow. It didn't shut the town down...
...and Pooka loved it.